
Setting A Proxy
Click proxy via Browser, or search for Proxy via “What to search?”
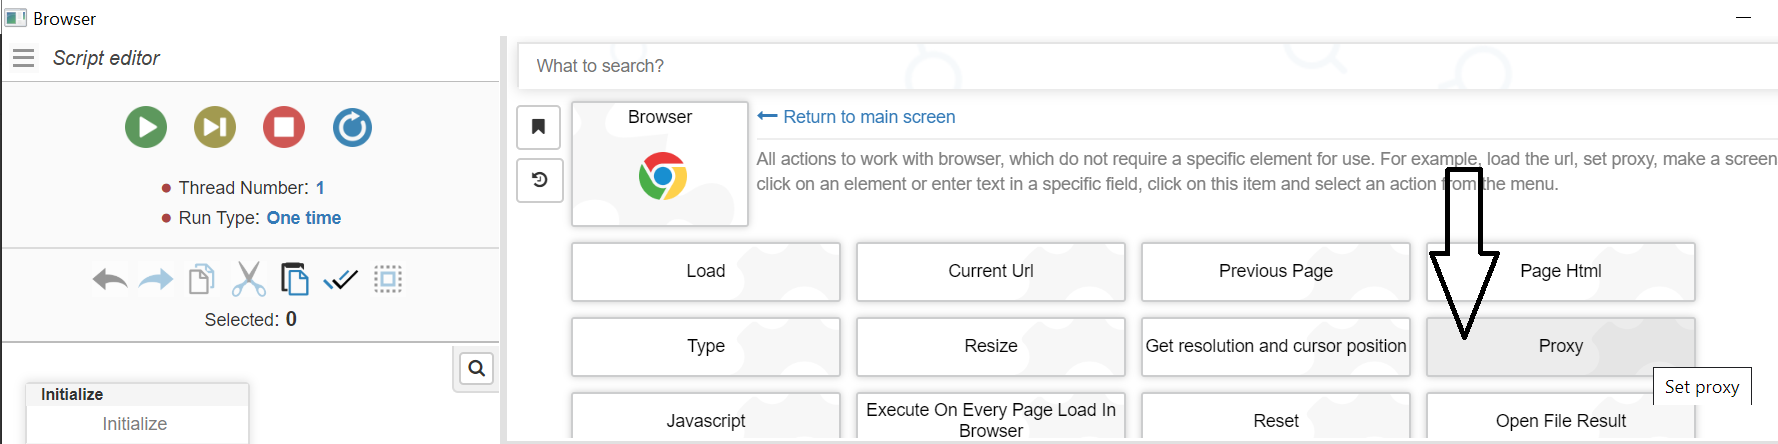
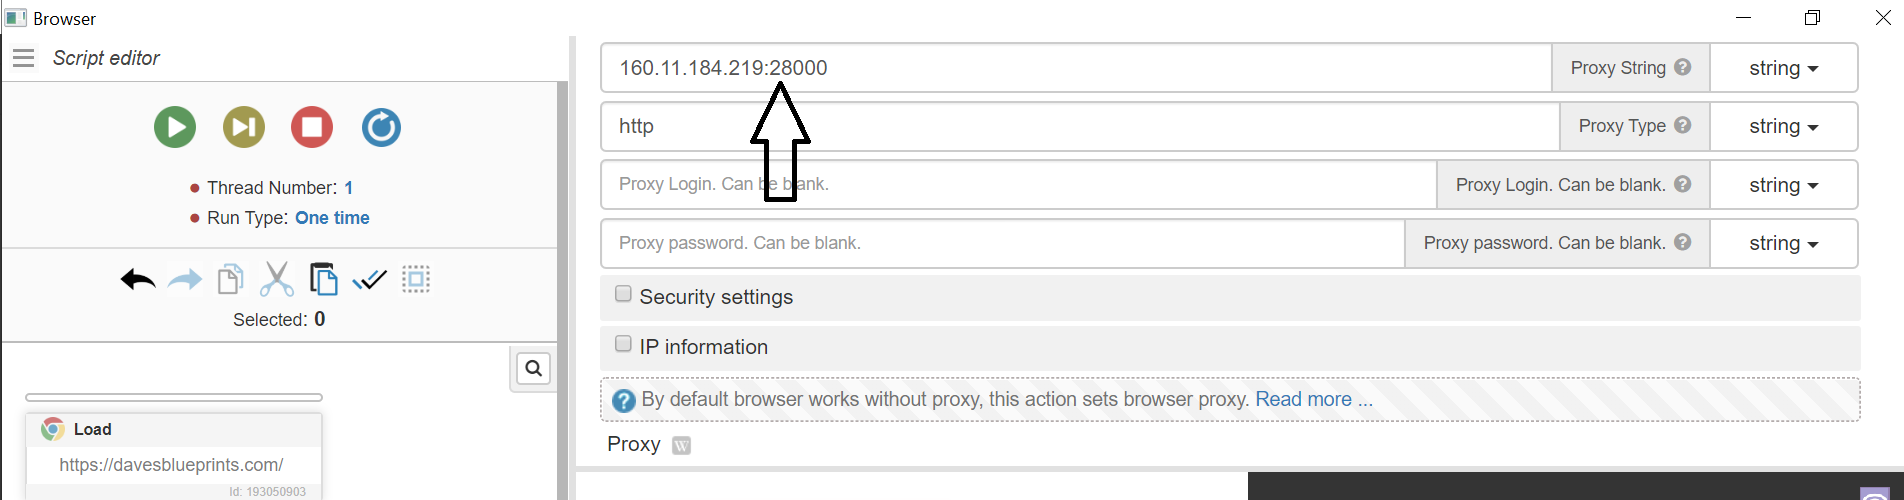
Add the proxy in the Proxy string box
If proxy has login details, add them as below OR see step 4
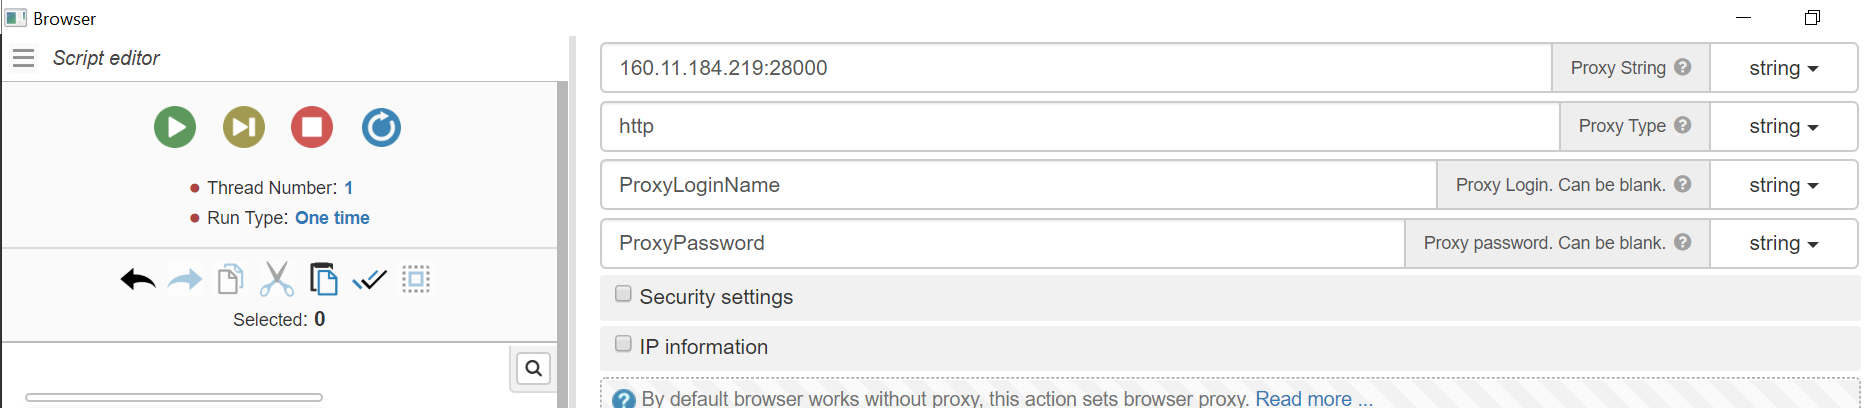
You can also add the proxy in this format with Proxy:port:login:password in a single string.
If you move your cursor over the “Proxy String” question mark, it gives some other accepted proxy strings that are recognised also.

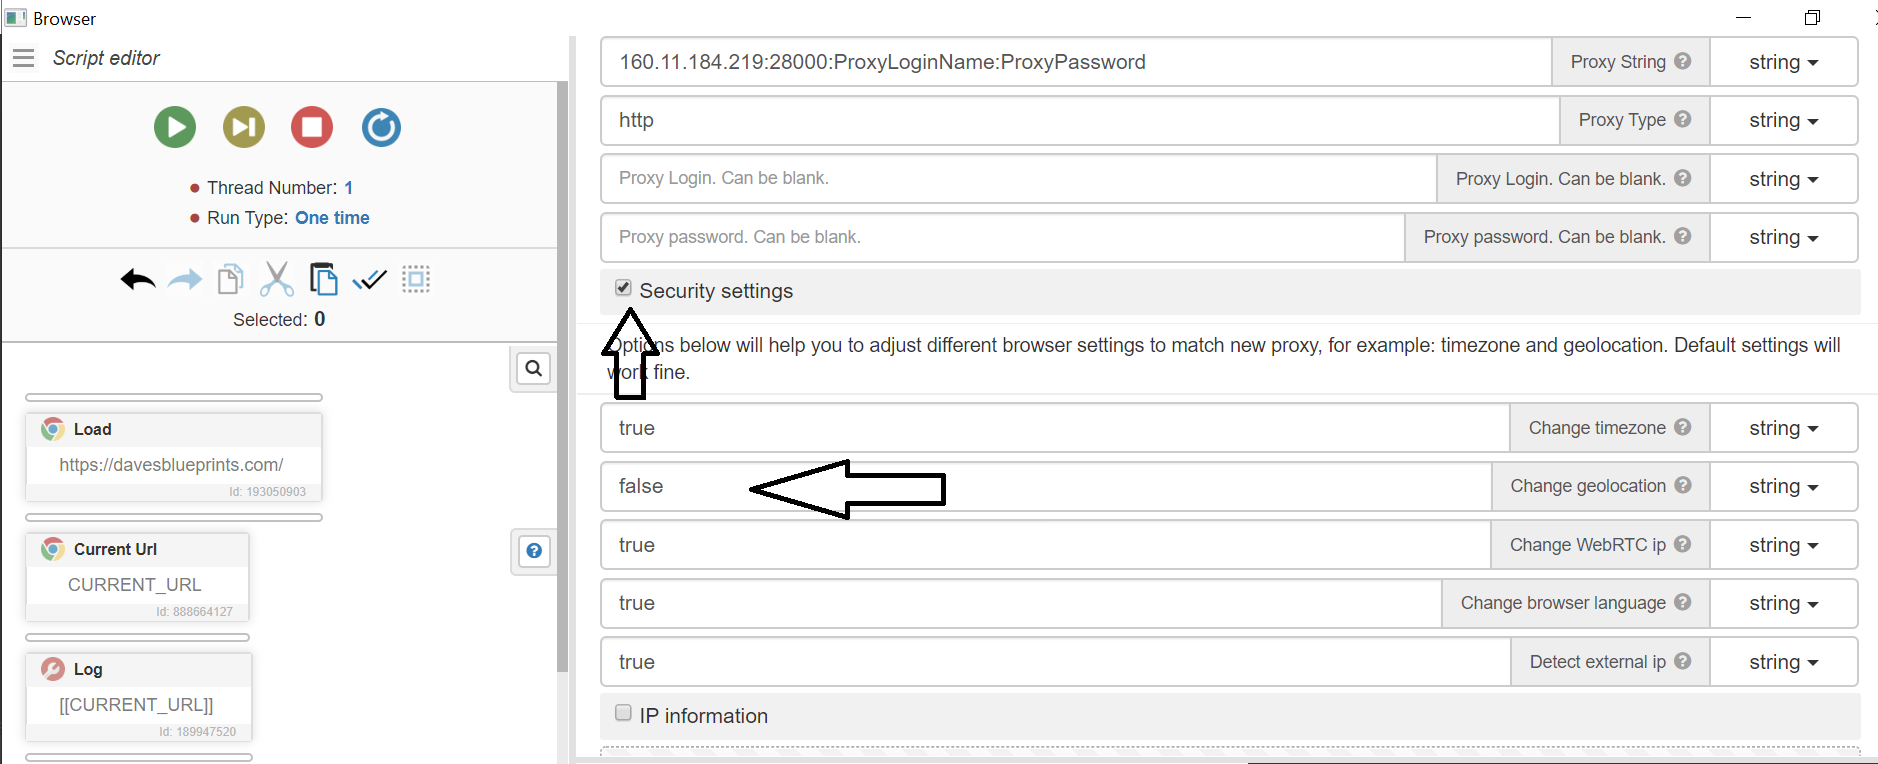
If you click on Security settings, you can adjust some more settings. I recommend changing “Change geolocation” to TRUE instead of false. So the geolocation of your browser appears to be where the proxy is located.
Please follow and like us:
Hello. And Bye.
Hey people!!!!!
Good mood and good luck to everyone!!!!!
Dogs Cane Corso in Moscow
cane-corso.moscow
Hey people!!!!!
Good mood and good luck to everyone!!!!!
Hey people!!!!!
Good mood and good luck to everyone!!!!!
Инъектирование [url=www.legostart.ru/kak-vosstanovit-nesuschuyu-sposobnost-konstruktsiy-iz-betona-i-kirpicha/]www.legostart.ru/kak-vosstanovit-nesuschuyu-sposobnost-konstruktsiy-iz-betona-i-kirpicha/[/url] .
Инъектирование стен [url=remontmechty.ru/remont/inekcionnaya-gidroizolyaciya-effektivnaya-zashhita-ot-vlagi]remontmechty.ru/remont/inekcionnaya-gidroizolyaciya-effektivnaya-zashhita-ot-vlagi[/url] .
Инъектирование бетона [url=www.stroika-tovar.ru/articles/stati/usilenie-fundamentov-zdanij-metallom-buroinekczionnymi-svayami-i-inektirovaniem.html]www.stroika-tovar.ru/articles/stati/usilenie-fundamentov-zdanij-metallom-buroinekczionnymi-svayami-i-inektirovaniem.html[/url] .
купить 1с в москве [url=sites.google.com/view/avtomatizaciya-buhucheta/%D0%B3%D0%BB%D0%B0%D0%B2%D0%BD%D0%B0%D1%8F-%D1%81%D1%82%D1%80%D0%B0%D0%BD%D0%B8%D1%86%D0%B0]купить 1с в москве [/url] .
карниз для штор электрический [url=superogorod.ucoz.org/forum/2-3737-1]карниз для штор электрический[/url] .
электрические гардины для штор [url=www.masa.forum24.ru/?1-12-0-00000106-000-0-0-1749633540/]электрические гардины для штор[/url] .
электрокарнизы для штор купить в москве [url=www.severussnape.borda.ru/?1-5-0-00000045-000-0-0-1749631053/]электрокарнизы для штор купить в москве[/url] .
карниз с электроприводом [url=www.pelsh.forum24.ru/?1-3-0-00000036-000-0-0-1749632852/]карниз с электроприводом[/url] .
электрошторах [url=www.karnizy-dlya-shtor-s-elektroprivodom.onepage.me/]электрошторах[/url] .
1с предприятие купить программу цена [url=astana.forum24.ru/?1-6-0-00001376-000-0-0-1750255315]1с предприятие купить программу цена [/url] .
1с бухгалтерия купить онлайн [url=www.moskovsky.borda.ru/?1-7-0-00009426-000-0-0-1750256561]1с бухгалтерия купить онлайн [/url] .
1с бухгалтерия 8.3 купить цена [url=assa0.myqip.ru/?1-4-0-00005853-000-0-0-1750258413]1с бухгалтерия 8.3 купить цена [/url] .
дизайнерские горшки для цветов [url=www.dizaynerskie-kashpo-spb.ru]дизайнерские горшки для цветов[/url] .
доставка еды челябинск круглосуточно [url=cah.forum24.ru/?1-11-0-00000061-000-0-0-1750413232]доставка еды челябинск круглосуточно[/url] .
силовой трансформатор купить [url=www.skoleoz.borda.ru/?1-8-0-00001992-000-0-0-1750403917/]силовой трансформатор купить[/url] .
доставка еды обеды челябинск [url=pelsh.forum24.ru/?1-8-0-00000452-000-0-0-1750419507]доставка еды обеды челябинск[/url] .
888starz partners apk [url=www.mentrition.website/]888starz partners apk[/url] .
888starz ios egypt [url=www.sunnysideups.org/]888starz ios egypt[/url] .
скачать 888 старс [url=www. ]www. [/url] .
888старс [url=888starz.com.ru]888старс[/url] .
установка вакуумного водопонижения [url=airlady.forum24.ru/?1-7-0-00004008-000-0-0-1750669834]установка вакуумного водопонижения[/url] .
Рекомендую услуги проверенных хакеров. Обращался, сделали все быстро и качественно – [url=xakervip.com/forum/42/]Хакеры прошедшие проверку[/url] .
вакуумное водопонижение цена [url=www.aktivnoe.forum24.ru/?1-9-0-00001177-000-0-0-1750678964/]вакуумное водопонижение цена[/url] .
где купить напольное кашпо для цветов [url=www.kashpo-napolnoe-spb.ru]www.kashpo-napolnoe-spb.ru[/url] .
parimatch . [url=www.parimatch-app-download.com/]parimatch .[/url] .
mostbet uz skachat [url=mostbet-download-app-apk.com]mostbet uz skachat[/url] .
кашпо для цветов напольное вазон [url=www.kashpo-napolnoe-spb.ru/]www.kashpo-napolnoe-spb.ru/[/url] .
декоративное напольное кашпо [url=www.kashpo-napolnoe-msk.ru]декоративное напольное кашпо[/url] .
888starz bet download [url=888starz-downloads.com]888starz bet download[/url] .
кашпо для цветов напольное высокое пластиковое [url=www.kashpo-napolnoe-msk.ru/]кашпо для цветов напольное высокое пластиковое[/url] .
one win app download [url=www.1win-in1.com/]one win app download[/url] .
напольные кашпо для цветов купить интернет магазин [url=www.kashpo-napolnoe-spb.ru/]www.kashpo-napolnoe-spb.ru/[/url] .
купить напольные горшки недорого [url=kashpo-napolnoe-msk.ru]kashpo-napolnoe-msk.ru[/url] .
напольные кашпо для искусственных цветов [url=www.kashpo-napolnoe-spb.ru/]www.kashpo-napolnoe-spb.ru/[/url] .
кашпо садовое напольное купить [url=www.kashpo-napolnoe-spb.ru]www.kashpo-napolnoe-spb.ru[/url] .
888starz partners россия [url=888starz.com.ru]888starz partners россия[/url] .
цветочные горшки большие напольные пластиковые купить [url=www.kashpo-napolnoe-rnd.ru/]цветочные горшки большие напольные пластиковые купить[/url] .
888starz download pc [url=www.888starz-downloads.com/]888starz download pc[/url] .
brwmwkwd 1xbet [url=arabic1xbet.com]brwmwkwd 1xbet[/url] .
mostbet lapplication [url=mostbet-app-download-apk.com]mostbet lapplication[/url] .
mostbet apk 2023 скачать [url=mostbet1.app]mostbet apk 2023 скачать[/url] .
888starz partners se connecter [url=www.888starz-english.com/]888starz partners se connecter[/url] .
888starz bet uzbekistan [url=www.888starz-casino.com.ru/]www.888starz-casino.com.ru/[/url] .
888starz bangladesh [url=www.888starz-bet.world]888starz bangladesh[/url] .
стильно кашпо купить [url=www.dizaynerskie-kashpo-sochi.ru/]стильно кашпо купить[/url] .
прикольные горшки [url=dizaynerskie-kashpo-sochi.ru]прикольные горшки[/url] .
wn aksbt [url=www.parimatch-apk.pro]www.parimatch-apk.pro[/url] .
1xbet crash game hack apk [url=www.parimatch-apk.pro/]1xbet crash game hack apk[/url] .
заказать проект перепланировки квартиры Москва [url=www.eisberg.forum24.ru/?1-3-0-00000376-000-0-0-1754486777/]заказать проект перепланировки квартиры Москва [/url] .
стильные цветочные горшки купить [url=www.dizaynerskie-kashpo-rnd.ru/]www.dizaynerskie-kashpo-rnd.ru/[/url] .
горшки для цветов большие напольные пластиковые [url=www.kashpo-napolnoe-krasnodar.ru/]горшки для цветов большие напольные пластиковые [/url] .
комплектная трансформаторная подстанция купить [url=www.turforum.borda.ru/?1-8-0-00003432-000-0-0-1756370353/]комплектная трансформаторная подстанция купить[/url] .
стильные кашпо для цветов [url=dizaynerskie-kashpo-rnd.ru]стильные кашпо для цветов[/url] .
цветочные горшки с поливом [url=kashpo-s-avtopolivom-kazan.ru]kashpo-s-avtopolivom-kazan.ru[/url] .
самополивающиеся горшки для цветов [url=www.kashpo-s-avtopolivom-spb.ru]www.kashpo-s-avtopolivom-spb.ru[/url] .
перепланировка нежилого помещения [url=aktivnoe.forum24.ru/?1-9-0-00001303-000-0-0]aktivnoe.forum24.ru/?1-9-0-00001303-000-0-0[/url] .
согласование перепланировки нежилых помещений [url=severussnape.borda.ru/?1-9-0-00000054-000-0-0]согласование перепланировки нежилых помещений[/url] .